
Timelapse videos are beautiful, capturing a series of moments, as they happen, over a period of time. Timelapse videos are useful for showing how some important changes happen as the construction progresses over time at the project site.
They are also a great way to showcase the details of a project, as it gets developed from ground zero upwards. Once you start recording timelapse videos, it’s easy to see how these videos can be used for so many different purposes. From sharing periodic project progress reports to senior management to utilizing these videos for marketing purposes. From communicating important milestones with stakeholders to attracting potential investors. The list goes on..
If you’re looking to produce incredible construction timelapse videos, but aren’t entirely sure where to start, then this is the article to read. In this blog post, we will cover everything you need to know about different important elements required for developing a high quality timelapse video.
Table of Content
1. Timelapse Camera
You can’t think of creating a video without first thinking of getting a camera. While the in-built camera of a mobile phone, or a DSLR are options, we recommend that you go for a specialized timelapse camera unit. The quality of your timelapse video will depend largely on the quality of the camera used to shoot it.
The best timelapse cameras are effective for shrinking long construction days, months, or even years, into a few seconds and create most engaging videos. Using devices other than a dedicated timelapse camera will require that you install a weatherproof enclosure for the camera to withstand the harsh conditions at the construction site. Additionally, continuous power supply, Wi-Fi connectivity, SD card for local storage may have to be provided, which can prove to be cumbersome for a hassle free usage at a project site.
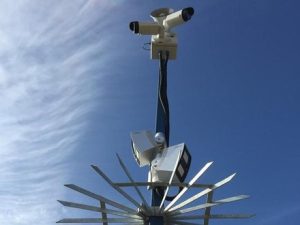
At Studio 52, we use 100% solar-powered & 100% wireless, all weatherproof, 3G / 4G / LTE enabled, integrated timelapse camera units that guarantees a 4k/6k quality output. Our cloud-based, remote management interface gives you instant access to your camera using your smartphone, tablet or PC and offers uninterrupted access for monitoring your project site.
2. Project Site
Prepare the site before installing time-lapse cameras to capture construction progress effectively. Determine the right number of cameras and optimal placement through a technical site visit. This also helps identify additional setup needs like scaffolding and site clearance.
The timelapse cameras will remain fixed at a particular location at the project site from a few months to a few years. Hence it is important to select the strategic location for camera installation at the project to avoid any disturbance to the cameras or blocking of view over a period of time which may then result in relocation of cameras. Thus hampering the entire purpose for which the cameras were installed.
3. Storage
Mastering timelapse photography involves capturing images of the project site from the same fixed angle at a scheduled time frequency, 15 mins / 30 mins / 45 mins, there should be sufficient storage available to save all the images for the entire project duration. While memory cards with an adequate capacity may suffice, it is more advisable to go the route of secured cloud storage. That way, you get to surmount the different limitations of local storage, including facing the risk of data loss due to corrupt files.
4. Network Data
Many timelapse cameras come with features that can be controlled remotely via Bluetooth and Wi-Fi. So, it is important that you make plans for a stable network. To curb instances of poor internet connection, have multiple options that include Wi-Fi, and the use of mobile or SIM card data.
Network data is particularly important for navigating through the camera functions including online access of the cameras, live streaming and for cloud storage.
5. Compact & Integrated Unit
It is best to work with a compact and integrated unit. The more portable the setup, the better. Cameras specifically designed for timelapse photography always come with an in- built intervalometer. This way, you have to carry less appendages.
Overall, special timelapse cameras units are better than DSLR cameras for recording your timelapse images. If using a DSLR camera, consider its weight, as it is bulky and requires additional weatherproof protection despite its high-quality output.
6. Scaffolding
You’ll also need some way to install your camera. Use a stand or gimbal to mount your camera at a higher elevation for full site coverage.
Scaffolding is the easiest way to install a time-lapse camera at a higher elevation, providing easy access for maintenance. Ensure it is made of strong material and set on stable ground for safety and stability.
What is Scaffolding?
Scaffolding is a form of temporary structure used for construction and maintenance projects to enable workers, technicians, engineers to work safely at heights. It consists of a framework, called a scaffold, that is usually supported by pillars or posts. Built around the perimeter of a building, scaffolding has to be constructed to large heights in multi-story buildings.
It is used in all aspects of construction, including residential and commercial projects. It provides workers with a stable platform to access higher and hard-to-reach areas.
The scaffolding can be erected quickly and taken down just as fast when the project is complete. The major advantage of scaffolding is that it provides protection for the workers and other people working on the site.
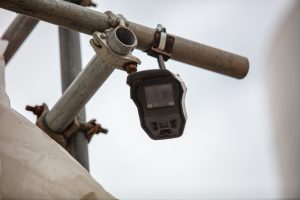
Use of Scaffolding To Install Timelapse Camera Units
Depending on the type of scaffolding you use, you can install the timelapse camera units at different heights as desired on the structure. Multiple timelapse camera units can be installed on the same scaffold structure covering different angles of the project site.
Scaffolding allows flexible camera installation with mounts and brackets, but it must be placed safely without blocking pathways or roads. Depending on the location where you are recording, you will also want to consider what the weather is like. Scaffoldings stay outdoors for long periods, so use high-quality, well-coated materials to prevent rusting.
Conclusion
This article elaborates on the use of scaffolding structures as an important element for your ideal timelapse camera videos. Using scaffolding instead of poles or towers ensures easy access and smooth long-term operation of timelapse cameras. Construction projects take time, so proper setup matters.
Share your experience in the comments or contact Studio52 for engaging timelapse videos.