
Ever wondered why some safety videos actually get remembered while most get ignored? This blog breaks down exactly how a safety animation video comes together, from defining the objective to final export. You’ll see how scripting, storyboarding, and choosing between 2D and 3D animation shape the final result. It also covers common mistakes, best practices, and why studios like Studio 52 are often brought in to handle HSE/EHS animation and compliance training the right way.
Nobody remembers a 40 page safety manual. Most people barely finish reading it. But show them a two minute animation of someone getting their hand caught in unguarded machinery, and suddenly the message sticks. That’s the real power of safety animation, and it’s why so many companies are switching from PDFs and posters to actual video content. If you’ve ever wondered what goes on behind the scenes of one of these videos, this guide walks you through the whole thing, step by step.
Looking to create safety training that employees actually remember? Safety Video Production transforms complex procedures into clear, engaging visuals that improve knowledge retention, strengthen workplace compliance, and reduce risks. Invest in impactful safety videos to build a safer, smarter, and more confident workforce.
Table of Content
What Is a Safety Animation Video?
Put simply, it’s a safety animated video that shows workplace hazards and the correct way to handle them, using characters and illustrated environments instead of real footage. You’ll see this format used heavily for HSE/EHS animation, induction videos, and compliance training in industries where things can genuinely go wrong if procedures aren’t followed. The big advantage? You can show a dangerous scenario in full detail without ever putting a real person near actual danger.
Why Safety Animation Videos Are Important
Here’s the thing about safety training: it only works if people actually understand and remember it. Animation does that job better than most formats. It breaks down complicated steps into something visual and easy to follow, no matter what language someone speaks or how comfortable they are reading technical documents. That’s also why multilingual safety training has become so common with animated videos, since swapping out a voiceover is far easier than reshooting a live action film. And when compliance training needs to look the same across ten different sites, animation keeps that consistency intact.
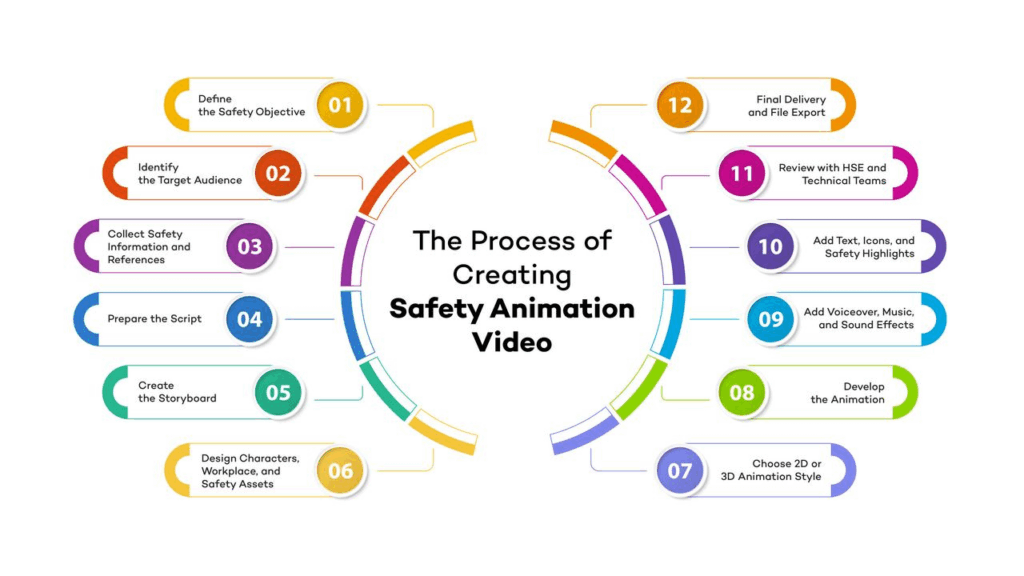
Step 1: Define the Safety Objective
Before anyone touches a script or a design tool, you need to know exactly what this video is trying to fix. Is it about forklift operation? Chemical spills? General site induction for new hires? Pick one clear focus. Trying to cram five safety topics into a single video almost always backfires.
Step 2: Identify the Target Audience
A video built for seasoned warehouse staff won’t land the same way with a fresh batch of interns. Think about who’s actually watching this. Their role, their familiarity with the site, and even how much technical language they’re used to hearing, all of it shapes how the video should be written and paced.
Step 3: Collect Safety Information and References
This is the unglamorous but necessary part. You gather SOPs, HSE documentation, real site photos, equipment specs, and maybe even past incident reports if they’re relevant. The goal here isn’t speed; it’s accuracy. Skip this step, and the final video will feel generic or, worse, wrong.
Step 4: Prepare the Script
Now you actually start writing. Keep sentences short. Cut the jargon. A good safety script reads like someone explaining a procedure to a coworker, not like a legal document. Break it into clear scenes tied to specific actions, because that structure makes everything easier later.
Step 5: Create the Storyboard
Once the script gets approved, someone sketches out how each scene will actually look, frame by frame. Think of it as a rough comic strip version of the video. It’s far cheaper to fix a problem here than after animation work has already started.
Step 6: Design Characters, Workplace, and Safety Assets
This is where things start looking real. Characters, PPE, machinery, signage, the actual factory floor, or job site, all of it gets designed to match the real environment as closely as possible. For industrial safety video production, especially, this accuracy matters a lot. People notice when something looks off, and that can quietly undercut the message.
Step 7: Choose 2D or 3D Animation Style
This decision shapes everything that comes next. 2D/3D safety animation, each brings something different to the table. 2D tends to be quicker and cheaper and honestly works fine for simpler procedures. 3D adds depth and realism, which helps a lot when you’re showing complex machinery or a large facility layout. There’s no universal right answer here; it really comes down to budget, timeline, and how much detail the topic genuinely needs.
Step 8: Develop the Animation
This is the long stretch where the storyboard finally turns into motion. Scene by scene, animators work through movement, pacing, and camera angles, making sure nothing feels rushed and every safety cue lands at the right moment.
Step 9: Add Voiceover, Music, and Sound Effects
A flat, robotic voiceover can quietly kill an otherwise great video, so this stage deserves real attention. Music and sound effects add weight to key moments too, like a warning alarm or a sudden machine stop. And if the company operates across different regions, this is usually where multilingual safety training versions get recorded, often reusing the exact same visuals with a different language track layered on top.
Step 10: Add Text, Icons, and Safety Highlights
On screen text and warning icons aren’t just decoration; they’re backup. If someone misses a line of narration, a highlighted hazard zone or bold warning text can still get the message across.
Step 11: Review with HSE and Technical Teams
Before anything gets finalized, HSE professionals and technical staff need to actually watch it through and confirm every step shown matches the real, approved procedure. Skipping this review is risky, even if the video looks polished.
Step 12: Final Delivery and File Export
Last step, export everything in the right formats for wherever the video will live, whether that’s an LMS, an internal training portal, or a big screen at a site induction session.
Common Mistakes to Avoid While Creating Safety Animation Videos
A lot of safety videos miss the mark because they try to cover too much, run too long, or look cluttered with unnecessary detail. Some teams skip script review entirely and jump straight into animation, which almost always causes rework later. Others lean on generic stock animations instead of custom visuals, and viewers can tell the difference immediately. None of these mistakes are huge on their own, but together they quietly weaken the whole video.
A professional Safety Animation Video for Oil and Gas helps companies communicate critical safety procedures effectively, improve workforce awareness, and deliver engaging training solutions that support safer operations and better compliance.
Best Practices for an Effective Safety Animation Video
Keep each scene focused on one idea. Use real references from the actual workplace whenever possible. Choose a narration tone that feels natural, not overly formal. And before rolling it out company wide, test it with a small group first, since their reactions often reveal gaps you wouldn’t have caught otherwise.
Ideal Length for a Safety Animation Video
Two to five minutes tends to be the sweet spot. Shorter than that and you risk leaving out something important. Longer, and people start tuning out before the video even finishes. The right length really depends on how complex the procedure is, but if you’re unsure, lean shorter.
Why Hire a Professional Safety Animation Company?
Honestly, doing all of this well in-house is harder than it looks. Scripting, design, animation, sound, technical accuracy, it’s a lot of moving parts that need to work together seamlessly. Studio52 handles the entire process under one roof, with teams who genuinely understand HSE/EHS animation, induction videos, and industrial safety video production across multiple industries. Instead of coordinating five different vendors and hoping everything lines up, you get one team that already knows how to do it right.
Conclusion
A safety animation video isn’t just a nice add-on for your training program; it’s something that can genuinely change how well people retain and follow safety procedures. Every step in this process matters, from the very first objective you define to the final file you export. If you’re ready to turn your safety procedures into a video people actually remember, Studio 52 can help you build exactly that.
Get in touch with Studio 52 and let’s create a safety video that actually works.
UAE: +971 44541054
Saudi: +966 12 4220506
Email: askus@studio52.tv
FAQs
What industries use safety animation videos the most?
Is 2D or 3D better for safety training videos?
Can safety animation videos be translated into multiple languages?
How long does it take to produce a safety animation video?
Why choose Studio 52 for safety animation production?