One of the most crucial challenges for e-commerce stores is creating a visually rich, authentic, and immersive online experience for shoppers. When people walk into a store, they often pick up the products they are interested in and examine them from different angles. The 360-degree product photography provides a similar experience when shopping online. Emulating this real-life experience gives shoppers greater confidence while making their purchase, reduces chances of returns, and also allows the business to stand out from the competition. A win-win situation for all!
However, creating 360-degree product photography is no easy feat. You can definitely do it with just a few essential pieces of equipment. Here’s a quick guide to creating 360-degree photography.
-
Table of Content
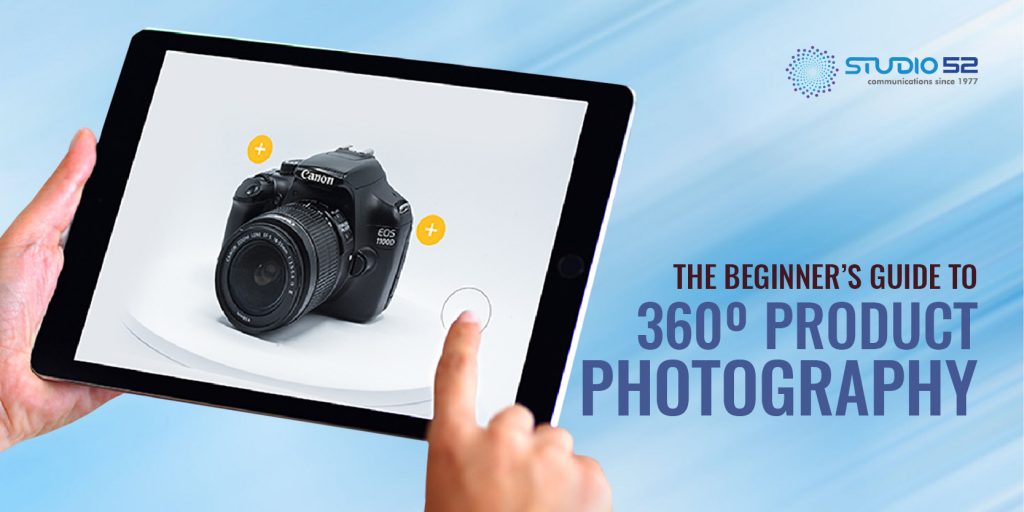
What is 360 photography?
360-degree photography is yet another step in photography’s evolution, all thanks to the dramatic progress in both software and hardware. This type of photography allows photographers to create a 360-degree view of a product, giving viewers a unique experience that is both visually compelling and addictively engaging. To create a 360 view of the product, the photographer simply shoots the product from every possible angle, which can range from anywhere between 24 to 1024 photos.
The 360-degree product photographs are interactive photos. This means if viewed on a computer, a user can use a mouse to drag and rotate the photo to see the product from each and every angle. The same can be done on a smartphone with the touch of a finger. On some websites, you may find that the photo spins automatically as if on a rotating display.
-
Why is 360-degree Product Photography So Important?
Product photos are the most essential element for every online business as they play a very important role in decision-making for buyers. A study shows that 360 photography satisfies the buyers 50% more than regular photos. Also, 32% of the buyers spend more time on the website because of the availability of 360-degree product photography.
Now, you know what 360-degree product photography is and why it is important. This makes it the perfect time to work out whether you want to shoot your products yourself or outsource them to a professional 360-degree product photography studio. And your decision is most likely to be based on your level of experience in photography as well as your budget.
There are a number of experienced 360 product photography professionals in Dubai like Studio52, to take your pick from. The main advantage of outsourcing is that you get professional results without having to go through the learning curve of photography.
For those who are already doing product photography in-house, you may prefer to do it yourself. In that case, you would need some additional photography equipment that you will need to consider. Let’s discuss them in detail below.
-
What Equipments Are Needed to Shoot 360 Product Photographs?
360 product photography is fairly doable if you are a photographer yourself or have an excellent in-house team of photographers who can do the job for you. Here’s a quick guide to what equipments you need to create a 360-degree photograph of a product.
3.1 A DSLR
A basic good quality camera with manual mode is all you need. It’s important to have manual mode as all of the camera’s settings need to remain fixed throughout the shoot. You can use any good DSLR from Canon or Nikon for creating a 360-degree product photograph.
3.2 Tripod
For this kind of photography, it’s very important for the camera to be perfectly still in the exact same spot throughout the shooting process. As it’s impossible to hold the camera in the same position for that long, you need to have a sturdy tripod to hold the camera steady. So any sort of sturdy tripod will do nicely.
3.3 Lights
As with all kinds of photoshoots, lighting is key. You can use strobe lights or invest in some professional photography lights with umbrella attachments. This would reflect the light throughout the photo area so that there is no inconsistency in lighting as customers view the product from every side.
3.4 A Turning Table
This is the key piece of equipment for creating 360-degree product images. It comes in a variety of sizes depending on what you plan to shoot. There are even electric versions you can plug in so they’ll automatically rotate the exact same amount of degrees for every turn.
3.5 Remote Shutter Release
A remote shutter release is a device that you can hold away from your camera to actually activate the shutter and capture photos. This is technically optional, but it can help you to take photos without having to press the actual button on the camera.
-
How to Set Up The Camera and Studio?
Now, it’s time to set up all your 360-degree product photography equipment. If you are shooting anything that’s the size of your shoe or slightly bigger than that, you don’t need a big space. A small room would be enough to convert it into a product photography studio. Remember that this room should not have any natural light coming in.
Step 1 – Set your turntable in the middle of the room and cover it with white cardboard, the bigger the cardboard the better.
Step 2 – Place your product in the middle of the turntable.
Step 3 – Place your camera at the required position on your tripod from which you can get the best angle of your product.
Step 4 – Change your camera settings to ‘Grid’. This will help you to define the product position with each frame so that you can achieve consistency throughout the shoot.
Step 5 – Turn on the lights and choose the angles that work best for you.
Once you have your complete 360-degree photography setup ready, just get started.
Also Read- 5 Must-Follow Product Photography Tips
-
What to Do After The Photos are Clicked?
After you have taken the pictures of your product, gather them into a photo editing software of your choice and arrange them in a sequence if needed. Using Adobe Bridge, perform batch editing on your photos. Make all the changes you want like colour balance, removing extra space, or fixing the lighting and save your product images.

Wait, we are still not done!
You will need to upload your product images into a 360-degree viewer. A 360-degree viewer will display your images and make them interactive. It’s basically the software that lets people spin the product on any website. Yes, now you can take a breather, we are finally done
Tips on Getting the Best from Your 360-degree Product Shoot
Here are some quick tips to help you make the 360 product shoot a success.
- Make sure your product is squeaky clean. Even s small speck of dust can spoil your entire photoshoot.
- Keep your product at the centre of the turntable so that it doesn’t wobble on spinning.
- Turn off the Auto White Balance (AWB) on your camera.
- Set the ISO to 100.
- Each angle should be evenly spaced on your turntable.
- As an industry standard, rotate the turntable clockwise.
- Shoot in JPG format as the file size would be smaller and editing would be faster.
Wrapping Up…
So there you have it. 360-degree product photography is an exciting new frontier in the world of eCommerce. It provides customers with a far more tangible way of viewing products and controlling how they view them.
Improving customers’ buying experience in an environment that is increasingly digital means bringing them closer to the products by means of any resources within your reach. 360-degree product photography is an affordable and fast way to immediately enrich your catalogues, marketing resources, and product pages.
360-degree product photography is already becoming the standard in eCommerce, so make sure you are ahead of the crowd. Start creating today or get in touch with us to show off your products from an entirely new perspective!